To Configure a New or Existing ALIM Web Virtual Directory
- Open ALIM Web Manager. The ALIM Web Manager window appears. For example,
-
Do one of the following:
To create a new virtual directory, select the Default Web Site that you want to create this virtual directory under, then select File, and then select New Web.
or
To make changes to an existing virtual directory, select the IIS website under which your virtual directory exists, then select your virtual directory from the list and select Edit, and then Properties.
-
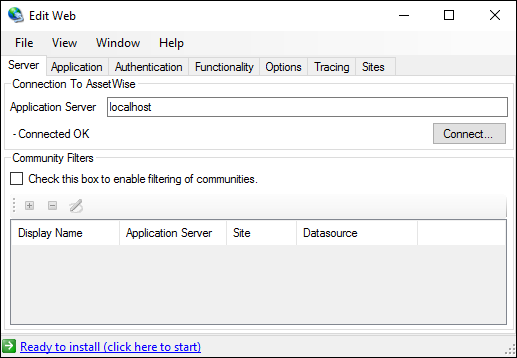
On the
Server tab, do the following:
-
In the
Application Server field, enter the name of the
computer on which
AssetWise Information Integrity Server is
installed.
It is recommended that you use the fully qualified domain name (FQDN) of the computer. For example: awappserver.bentley.com
-
Click
Connect.
The ALIM Web virtual directory connects to the AssetWise Information Integrity Server.
-
If the server has more than one community, you can restrict
the list of communities on this server that your
ALIM Web users can choose from, by
doing the following:
- Select Check this box to enable filtering of communities.
- Click
+.
The Community dialog opens.
- The AssetWise Server field is populated with the name of the server to which you are currently connected. Click ? to populate the Datasource list.
- From the Datasource list, select the community you want to add to the list.
- You can enter a user-friendly Name for the community, otherwise the actual site/community name appears on the log in screen.
- Click
OK.
Repeat these steps for each community that you want to add to the list.
Tip: If there is only one community for the user to choose from and the user has a Windows account, then when the user clicks the URL for this website, AssetWise attempts to automatically log the user in to the community using their Windows credentials.Tip: A multi-site AssetWise environment has user bases that are geographically separate from each other. Although connecting to one common database, repositories can exist at each site and replication between those repositories can be configured. When uploading or downloading files, all files go through the ALIM Web Server. Therefore for performance purposes, it is important that the repository is local to that website. For this reason, it is recommended that you restrict the choice of communities for AssetWise users to log in to, when dealing with multi-site environments.
-
In the
Application Server field, enter the name of the
computer on which
AssetWise Information Integrity Server is
installed.
-
Select the
Application
tab, and then do the following:
-
Enter a
Name for your virtual directory.
This name is part of the URL to which your users will connect. For example, if the name of your virtual directory is "AW", then your users would point their browsers to http://<awwebservername>/aw where <awwebservername> is the name of your ALIM Web server.
- Accept or edit the Web site, Folder Location, and Application pool settings.
-
Enter a
Name for your virtual directory.
-
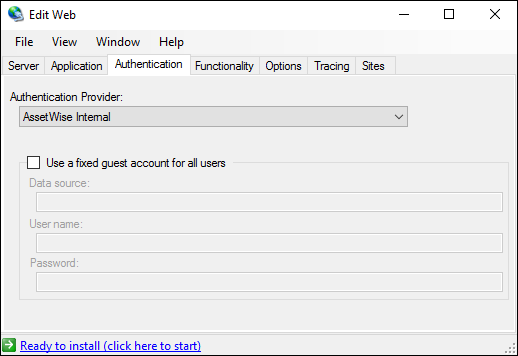
Select the
Authentication
tab, and then select the
Authentication Provider that you want this
virtual directory to use. Your choices are:
- AssetWise
Internal – Select this type if all users connecting to this website
will be logging in with an
AssetWise account.
By default, the Use a fixed guest account for all users option is turned off. This replaces the "automatic log in" option that was available in previous versions. This option should only be turned on if you are setting up an AssetWise website dedicated for everyday users who need to access AssetWise data and documents but do not need to add or change any information. (If you are configuring such a website, you would likely only turn on the most basic features on the Functionality tab - see the next step.) When this option is configured, all users who access this site will be automatically logged in to the specified community with the same AssetWise account, so the account you specify should have view-only access to the portions of the community's data you want to make available.
- Bentley
IMS – Select this type if you want users connecting to this website
to be able to log in with their
Bentley Cloud Services credentials.
Users connecting to this website will first be redirected to the specified
AssetWise Session service URI where they are
prompted to sign in with their
Bentley Cloud Services credentials
before gaining access to the community. If the website only points to one
community, then users gain access to the community as soon as they sign in with
their Bentley credentials. If the website points to more than one community,
then after they sign in with their Bentley credentials, users will be returned
to the standard
ALIM Web login page and select
their community.
- Session service URI – Enter the URL for the AssetWise Session service, the ambient authorization context for all AssetWise activities. The default value for production use is: https://session.eus2.aw-cs.bentley.com
- IMS OIDC URI – Enter the URL of the IMS issuer. The default value for production use is: https://imsoidc.bentley.com
By default, the Allow use of internal security login option is not selected. This allows the option to revert to AssetWise internal authentication in the ALIM Web login page after successful authorization with the AssetWise Session service.
- Windows
Authentication – Select this type if any users connecting to this
website will be logging in with their Windows domain accounts.
Note: Open IIS Manager and confirm that Windows Authentication and ASP.NET Impersonation are set to "Enabled" for this virtual directory, and that the other types of authentication listed are all set to "Disabled". Also, in the same area of IIS, open the Advanced Settings for Windows Authentication and confirm that Enable Kernel-mode authentication is turned on. For more information about configuring Windows Authentication, refer to your IIS documentation.
Important: If you configure this virtual directory to use Bentley IMS authentication, then you must also go to Service Request Manager and file a request to register your realm URI with AssetWise Session service - AssetWise
Internal – Select this type if all users connecting to this website
will be logging in with an
AssetWise account.
-
Select the
Functionality
tab and then do the following:
- From the Products group, turn on the main product features (plug-ins) that you want to enable in ALIM Web.
- From the Options group, turn on the optional features (plug-ins) that you want to enable in ALIM Web.
The following image shows all of the plug-ins available when you install ALIM Web Applications (these are not the only plug-ins AssetWise offers - you can install additional plug-ins later). All of these plug-ins are disabled by default:
Each optional plug-in is related to one or more of the main product plug-ins. While the options can be selected independently of the products, if you enable an option without enabling its related product, that optional functionality will not be available in ALIM Web.
The following table lists the main product plug-ins available for ALIM Web:Note: You must select at least one of the above plug-ins in order to be able to deploy the virtual directory.The following are optional plug-ins:
Plug-in Description Brava! Web Viewer Integration Adds support for the third party Brava! Viewer within ALIM Web. This plug-in requires additional configuration. For more information, see Integrating Brava with AssetWise ALIM Web Server Bulk Import and Export Add the ability to import/export files and folders into/out of AssetWise Change Management Helps to control the change process of controlled documents and items Change Packages Allows users to create a package of changes that is intended to be released for construction simultaneously. Comment and Review Tracking Adds the ability for comments tracking and replies General Report Allows the execution of AssetWise reports via a URL call. Object Comparison Add the ability to compare AssetWise objects, such as different versions of documents Data Administration Tools Adds administration features to the website Document Distribution Adds the ability to manage distribution of documents to customers and stakeholders Document Design Provides document creation capabilities using a wizard. Object Action Management Provides the ability to block or add tasks from appearing in the Task menu Package Distribution Order Provides users with the ability to send files to recipients inside and outside of the AssetWise environment. Physical Item Design Provides physical item creation capabilities using a wizard. ProjectWise Connector Plugin Provides bi-directional support for passing information to and from ProjectWise Publish information for distribution outside the application Adds the ability to publish folder structures to compiled help files (CHM) Quick Link URIs Create quick links to AssetWise objects by specifying their identifying number and other properties Records Management Adds the ability to control document records through the use of file plans Submittal Provides the ability to submit packages Subscriptions Provides the ability to subscribe to documents and receive emails when events occur to them Tag Display Add the ability to view Tag Data and associated relationships Tag Design and Operations Provides tag creation and editing capabilities. User Preference Administration Users can create and update personal and application wide settings in order to tailor various application behaviors Virtual Item Group Design Provides virtual item group creation capabilities using a wizard. Work Management Adds the ability to plan and organize processes through work orders and tasks Note: After configuring the Server, Application, and Authentication tabs, and then enabling at least one of the required product plug-ins on the Functionality tab, the message / link at the bottom of the dialog changes from There is some missing information (click here for details) to Ready to install (click here to start). You can either click that link to deploy the virtual directory now, or you can continue to the Options tab to view or change the default options. If you deploy now, you can always subsequently make changes to this dialog. - (Optional)
Select the
Options
tab and review or set the following options as needed:
Option Description Enforce completion of required fields If set to Yes, property editors will require that users complete all of the fields marked as required before they can save property edits Hide properties that are empty If set to Yes, property displays hide properties that are not assigned a value Hide relationships that are empty If set to Yes, relationship displays omit relationships that have no objects assigned to them URL templates for map links The template URL which will be used to create links that show an address on a map URL template for email address links The template URL which will be used to create links for email addresses. Leave this field blank if the website is exposed to the public internet URL template for VOIP calls Sets the template URL which will be used to create links for telephone numbers. If you do not have a SIP/VOIP system, or the website is exposed to the public internet, leave this field blank - (Optional)
You can select the
Tracing
tab and enable logging for this virtual directory.
To enable logging, do the following:
- Set Enable trace file output to Yes.
- In the Log Output list, select Seq Server Log. Note that general trace logging may be selected, however Seq Server Log is recommended because it is useful when reviewing support issues.
- Specify the Output Location for log information. If you are using Seq tracing, this is the https server URL for seq, for example https://seq.server.com:5341. If you are using file tracing, this is the folder name to create the login, the application will write trace data to a file with the name of the virtual directory in this folder. The folder must have "write" access for the virtual directory users to write to it.
- Select a Log Level from the list to set the level of logging you want to record for this virtual directory. Your options are: Error (default), Warning, and Information.
Enabling logging adds a <system.diagnostics> element to the web.config for this virtual directory, and this should satisfy most logging needs. For more information about configuring this element, see .
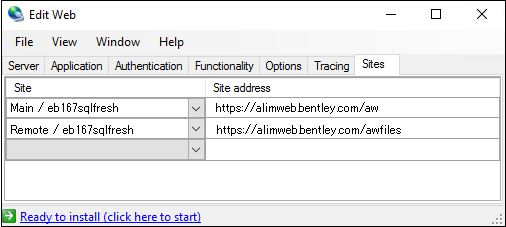
- (Optional) On the Sites tab, you can enable redirection of file operations to a different web server based on community sites for this virtual directory by doing the following: For example,
-
When finished with the configuration, click
Ready to install (click here to start).
If you are creating a new ALIM Web virtual directory, then the ALIM Web application is deployed to the virtual directory.
If you are making changes to an existing ALIM Web virtual directory, then the ALIM Web application is redeployed with the changes.
Note: When editing an existing virtual directory, you might encounter an error when you click Ready to install (click here to start) to redeploy. This is probably because you did not stop the IIS service before you began editing the virtual directory, and some files are still in use by IIS. If you get this error, all you need to do is close the error message and click Ready to install (click here to start) again.